Showing posts with label Color Burst. Show all posts

Saturday, October 22, 2016

More Falliday Fest cards with ODBD

I've been busy playing along with Splitcoaststampers Falliday Fest so there will be a flurry of cards (see what I did there with these cards) for the next few days.  

For my first card, I used Heather Telford's technique to make some snow covered trees using the tree from Joys of the Season.  I stamped in clear Versamark and then moved the paper a bit so that the black stamping would be slightly below and off.  I then clear embossed all of it and sponged a moonlight snowy scene.  The embossed image resisted the inking.  I love the effect!


For the second card, I went with a purple color burst background.  I decided to use the set Sending You Sunshine which is a "summer set" complete with a sandcastle.  But the "Warm Wishes" sentiment is perfect for this snowy card using the Snow Crystals dies.


For the last card today, I made a blue Christmas card using the new Snowflake Sky die, small bow die, and the Noel ornament stamp.  The background was sponged with blue distress inks and the stamp is embossed in silver. 


In other news, I am on Instagram now!  Follow me at @yourstrulybydiana.  Thank you!


Challenges I am playing in:

Monday, October 12, 2015

CCNS106: The Still Woods

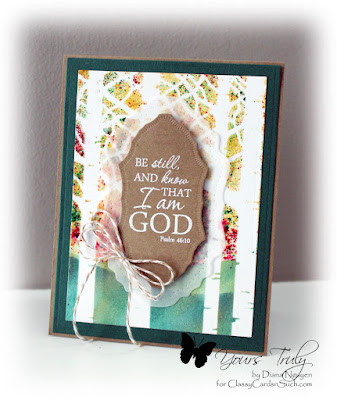
Hello!  Diana here with a very fall card for this week's Fall colors challenge.  The best thing about fall are the gorgeous colors (and warm drinks, sweaters, cool air, apple picking).  Yep, I love fall.  

To make my fall color card, I started with the Memory Box Garden Birch Trees stencil taped to white card stock.  I then masked off a curved piece of copy paper and sponged in some hills.  I then sponged the rest of the card with Squeezed Lemonade. Next, I covered the hills and misted my paper with a spritzer. I then added my color bursts Alizarin Crimson, Orange, Lemon Yellow, Pthalo Green.  So that it would look like individual leaves, I did not squeeze my bottles but just shook it out onto my stenciled paper.  I wanted individual drops of color and not too much blending.  Because I had already sponged the background yellow, I wasn't worried about covering up any white with the color bursts.  I then cut out the birch scene with Spellbinders A2 Matting Basics A and then also some green card stock with the largest die to have a double mat against my kraft base layer.

Though I hesitated to cover up my background,  I did just enough to be able to see that it was a wooded background.  I used two of the dies from the ODBD Vintage Flourish Pattern for my focal point.  By using vellum as one of my matting layers, I was able to have a mat for my Scripture from Verve and yet still see my background.  The verse was done with white detail embossing powder and then I added a twine bow.
Diana Nguyen, birch tree, stencil, Verve, color bursts

Thank you so much for looking and I hope you get a chance to play along!


Challenges I am playing in:

Thursday, August 20, 2015

Warm Thank You

Hello!  I've been wanting to play in the MFT Summer School all summer but it's been the busiest summer for me.  So I'm happy to play at least once with this last lesson of Color Temperatures.  I'll have to keep these lessons in mind when I lose my mojo and can't seem to start a card.  

I went with a warm color scheme in honor of this hot hot hot weather we have been having.  It's a stretch for me as I prefer blues and greens but it's good to stretch my creativity a bit.

I started with a stitched white rectangle using MFT Blueprint 13 and sponged some Squeezed Lemonade near the center of my card.  I then squeezed my spritzer just a couple of times before adding some Orange Color Bursts.  It's hard to get a "controlled" look with the color bursts but I just love the look of the tiny splatters. It's perfect with the lilies since their pollen will do just that to your clothing!  I then used the Impression Obsession Square Cutout Border down layer to remove some of the coloring and to add depth to the card by popping up the base layer with large foam tabs.   My MFT Lily Die-namics were cut on yellow card stock, colored with Copics and then glued together with the Art Institute glue. I added a little thank you sentiment using ODBD Ornate Frame Sentiments  with black pigment ink and clear embossing powder.  The stitched circle is also from MFT Blueprint 13.


Thank you for looking and I hope you enjoy the last couple weeks of summer!

Thursday, August 13, 2015

Color Burst with Poppies

Hello!  Diana here using some of my favorites from the Classy Cards 'n Such on-line store to make a quick and fun card.  I started off with the stitched rectangle from MFT Blueprint 13 (you knew that was coming, right?) and used my Spritzer bottle to just wet the lower left corner of the base.  I then used just a little bit of the Pthalo Green color burst.  A little goes a long way!  While it was drying, I die cut Memory Box Row of Poppies and colored it using watercolor brush pens.   After the color burst was dry, I made a diagonal grid cut out using Impression Obsession Square Cutout Border.  It gives such a different look just by changing the angle!  You can see that I also did it for the inside of the card in the opposite direction.  After adhering the poppies to the front of the card using Art Institute glue.  For a final touch, I used a gold gel pen on the left edges of the poppies. 


Diana Nguyen, Memory Box, Impression Obsession, square cutout border, color burst, poppies

Thank you for looking!


Don't forget that you can use the coupon code DIANAN-10 to the Classy Cards 'n Such on-line store for many of the items I used today.


Thursday, July 23, 2015

Peek a boo Butterflies

As promised, here is the card I made using the Impression Obsession Square Cutout Border where the background peeks out.  I made my background by using watercolor paper and spritzed it with water using my mini spritzer so that I could control the amount of water I put on there.  I then used 3 colors from my color burst collection:  Pthalo Green, Ultramarine Blue, and Violet.  I love how vibrant the colors are and it's so fun to see the colors just come alive when it touches water.  While I set that aside to dry, I used the largest rectangle in the Spellbinders A2 Matting Basics A to create my top white layer. I then cut out my squares with the Impression Obsession Square Cutout Border.  

I didn't know it when I ordered the Memory Box Rhone butterfly but it does not cut the butterfly completely out.  The wings are cut but the abdomen portion is still attached.  It's very easy to snip the butterfly out if you want it to be free floating but I just love it that is is still attached.  I didn't have to worry about gluing it down or that it might shift or fall off in the mail. The body is a separate die and I did glue that over the wings. I also added Open Scroll Leaf by Impression Obsession in two shades of green out of adhesive card stock by DCWV.  I then adhered the top layer and the watercolor layer using Scor-tape to make sure everything stayed down.

Best part about this card?  It only took 15 minutes to make if you didn't account for the drying time since I didn't have to glue down the butterflies or the leaves (adhesive card stock!!! Totally forgot I had those!) it all came together very quickly.


Diana Nguyen, Memory Box, butterfly, Impression Obsession, Square Cutout
I was so pleased with how easy it was to use the butterfly this way that I added one to the inside of my card.  ;)


Thursday, July 9, 2015

It's A Good Day

I can't stop playing with my color bursts! This time I exhibited a bit more self-control and used only 2 of my colors:  Lemon Yellow and Pthalo Green.  I used the stitched rectangle from MFT Blueprint 13 and aimed my spritzer at the bottom left corner.  I then used my color bursts to make my splatter background.  I then cut two of the Memory Box Bamboo Shoots out of two different shades of green.  The lighter green is also what I used for my card base.  I then popped up two pandas from Mama Elephant Pandemonium that I had stamped, used black detail embossing powder, fussy cut out, and then popped up in front of the bamboo using small Joy! foam pads.  The sentiment from Mama Elephant Up and Away was also stamped in black.

Just for something a little extra special, I also die cut the bamboo out of the stitched layer for the inside of the card.  I love the look of the negative  with the green peaking out.  Hope you like it too!


Don't forget that you can use the coupon code DIANAN-10 to the Classy Cards 'n Such on-line store for many of the items I used today.

Challenge I am playing in:

Monday, July 6, 2015

CCNS92: Birthday splatter

Hello! I'm so excited to share with you a card I made for this week's CCNS Splatter Challenge.  I just got my Color Bursts from the CCNS on-line store and I am having so MUCH FUN!  It's so easy to use and the end result is just amazing!  

I first cut a sheet of watercolor paper with the largest die from Spellbinders A2 Matting Basics A.  I then use my spritzer on my watercolor paper.  I only spritz a few times - I did not want the paper dripping wet - I wanted distinct splatters like those in the inspiration photo.  I then use my color bursts on the sheet (Alizarin Crimson, Orange, Lemon Yellow, Pthalo Green, and Ultramarine Blue) - it was like magic!  Color instantly appears and it was easier to control than I thought.  Some of the areas were a little too bare so I just spritzed some more water in those areas - the pigment was already there so you could see the change instantly.

Diana Nguyen, Happy Birthday, color burst, Our Daily Bread Designs

After I dried it with my heat gun, I carefully used ODBD Happy Birthday dies where I wanted the words to appear.  I then used Scor-tape to adhere the cut sheet onto a blue card base.  Instead of avoiding the open spaces from the letter, I went ahead and actually put the tape right across where the letters were.  That way, when I put the layers back in, there was already some strong adhesives right where I needed it to be. Instead of just doing a "regular" in-laid die-cutting technique, I popped up my sentiment using black fun foam.  You can get the same effect if you used black card stock and die-cutting several layers of the dies together.  I find that using the black foam is a lot faster because I only need one layer of it.  It adds great dimension to the card and I love the shadow effect. 

Diana Nguyen, Happy Birthday, color burst, Our Daily Bread Designs

I also added some matching rhinestone bling to the card for just a bit of extra sparkle.  I hope you get to play with some color bursts soon!  I think you'll really love it.  (Enabler warning:  The whole set is on sale right now at the CCNS on-line store!)  You'll be seeing more cards here using these soon!


Don't forget that you can use the coupon code DIANAN-10 to the Classy Cards 'n Such on-line store for many of the items I used today.

Challenge I am playing in: