Showing posts with label Sweet 'n Sassy. Show all posts

Wednesday, December 18, 2019

Tea-rific Birthday

Just a quick pop in (because it's crazy busy this month as I'm sure it is for you) to share a card I made for a birthday that had a tea party theme. I masked and sponged the Poppystamps Teacup stack die and added a handwritten tag to the Sweet 'n Sassy Stamps birthday die.

Have a great week - only one more left until Christmas!


Challenges I am playing in:


Thursday, November 8, 2018

Stamping over watercolor background

My friend brought over this beautiful landscape silhouette stamp set by Sweet and Sassy Stamps and we found a card we wanted to case.  The original card looked like it might have been brayered or sponged but I tend to have a very heavy hand when I use inks.  So I used watercolors instead.  My friend Kelly and I also have learned that we should make more than one card of the same design (especially if we mess up on any one of the steps!) so on this we made two.  


The first one inked up much crisper on the mirror stamping (I used the Stamp of Life one) but for I could not get it to do it again for the second card.  So the water was not as calm on the second card. Lol!


The Bible verses are by Verve and Our Daily Bread Designs.


Sunday, November 4, 2018

Replenishing my card stash

A few more cards using various Our Daily Bread Design scripture stamps.  It's always good to have a few on hand to send or give to someone.


Background stamp from Sweet and Sassy Stamps.


Die from Memory Box and a Tombow Marker on photo paper background


I love this oldie but goodie Cottage Cutz grapevine wreath.


Gotta use those stamps I lettered for ODBD!  :)


Challenges I am playing in:


Friday, September 21, 2018

Oh so many scraps

A LONG LONG time ago, approximately 2 years, I made a quilt card and I did it in the most tedious way possible.  I die cut the same dies over a dozen times to make ONE card.  Considering how now I use both the positive and negative of a die now, it's quite funny.  

But like quilting, with papercrafting comes oh, so many scraps.  So one night I sat down and was determined to use the scraps I had saved... though not very carefully because there was not a complete set of anything.  Haha!  So instead of making a quilt, I glued them in a more graphic and freer pattern and came up with quite a few cards.  I'm showing my favorites here and you can see that I couldn't decide if I wanted to go stark white or a softer gray neutral.

I also went to my collection of word dies and paired them up for my different moods.  (If you knew how much time I waste on finding the perfect font for projects...)


Classy and elegant with Quietfire Design - always my go-to-company for word dies for obvious reasons.


Cute and whimsical with Lawn Fawn.


Sweet and kiddie with Sweet and Sassy Stamps.


Modern and fresh with Altenew.


Saturday, November 11, 2017

Craft play date with Quietfire Design dies

I admit I've been in a bit of slump lately with my card making.  The good news is that my desk has been cleaned rather frequently ( my "go to" thing to do when I'm not just inspired is to start cleaning my desk).  It's also handy to have the desk already cleaned when I have a craft play date... and got some cards to share from a recent play date.

One thing my friend and I both love to use are word dies - somehow it just seems easier to play around with then stamps sometimes.  We had a great time using Quietfire Design word dies with a combination of other stamps and inks.


Quietfire Design small Happy Birthday
Lawn Fawn Into the Woods
Sweet and Sassy Falling Leaves


Quietfire Design Prayers
Sorry - can't remember who made the solid leaves stamps


Quietfire Design Be and Unforgettable and Butterfly Flourish
CAS-ual Friday Starlequin background stamp

So what do you do when you have lost your mojo or just feel uninspired?  I'd really love to know!


Monday, March 20, 2017

Thank you

Here is another card I made during my craft play date.  My friend brought along her Sweet and Sassy Stamp set Kindness set and we combined it with A Way With Words thank you die set.


The different sizes of the dogwood was clear embossed on white cardstock and then sponged over with distress ink Worn Lipstick.  I then added the thank you in gray with a white offset.


thank you - Metal Cutting Dies


Thursday, January 28, 2016

Faith

In our area, we have a farm that has a bamboo maze (instead of a corn maze) so I thought the pairing of the new Quietfire Design Faith word die went perfectly with my sentiment from Sweet 'n Sassy Stamps The Future:

Doubt sees obstacles, Faith sees the way.

I started by trimming a piece of white card stock with Spellbinders A2 Matting Basics A.  I then sponged some Mowed Lawn in a small area.  After it dried, I taped my layer to the Memory Box Textured Mesh and added Dreamweaver's white embossing paste with a palette knife. I then set that aside to dry and started die cutting Memory Box Bamboo Shoots and Quietfire Design Faith word die out of green card stock.  

Diana Nguyen, Memory Box, Bamboo, Faith, Quietfire Design, A Way with Words, stencil

When I tested in on the card, it was a little plain so I added ultra thick embossing powder to my die-cuts and it instantly gave it more polish and oomph.  Much better, don't you think?
Diana Nguyen, Memory Box, Bamboo, Faith, Quietfire Design, A Way with Words, stencil

For the inside of my card, I added another bamboo shoot die cut as well as a sentiment from Sweet 'n Sassy Stamps The Future


Diana Nguyen, Memory Box, Bamboo, Faith, Sweet 'n Sassy Stamps

Thanks for looking!


Challenges I am playing in:


Thursday, December 17, 2015

Tag, you're it!

Hello!  How is your shopping going?  Hopefully better than mine!  But I'll be ready for them with some tags I made when I finally do get around to shopping.  
Supplies:
My Favorite Thing Cross-Stitched Rectangles
MFT Blueprints 13
Impression Obsession Christmas Icons
Sweet 'n Sassy Christmas Joy
black detail embossing powder


Diana Nguyen, Christmas, Tag, Impression Obsession, Christmas Icons

1.  Die cut rectangle die out of red or green card stock.
2.  Die cut stitched circle and Christmas icons.
3.  Cut out fish tail banners.
4.  Emboss in black "Christmas Blessings", die cut, and pop up on tag.
5.  Punch hole on top and thread through ribbon.


They were so fun and easy to make - I even used one on top of one of my envelope gift boxes without the ribbon.  Enjoy creating for all the loved ones in your life!


Challenges I am playing in:

Thursday, December 10, 2015

Sending warm hugs

Hello!  Diana here and I am just loving this cute little Poppystamps Stacked Mittens die.  I wanted a soft card so I went for some light sponging with Peacock FeathersSqueezed Lemonade, and Picked Raspberry along one side of a stitched rectangle made with MFT Blueprints 13.  I then glued several layers of the Stacked Mittens  and added a couple of fish tail banners with a sentiment from Sweet 'n Sassy stamps For the birds done with silver detail embossing powder.  For a final touch, I added a bit of bling using sequins.  Hope you like it!

Diana Nguyen, poppystamps, Sweet 'n Sassy Stamps, winter


Thursday, December 3, 2015

Joy to the World

Hello!  Diana here with a great idea to share with you on making a quick Christmas card.  I found this beautiful sheet from an old paper pad from Recollection Botanical Noel.  Do you hoard paper - waiting for the perfect use?  But then don't want to cut it up or cover it up with too much?  Well, one thing you can do is stack 3 of the dies in the Spellbinders A2 Matting Basics A set and mat each of the die-cuts.  It gives it a great stacked look and emphasizes the paper.  I added a sentiment from Sweet 'n Sassy Christmas Joy stamp set embossed in black detail embossing powder and a floral spray using PoppyStamps Small Blooming Poinsettia and Impression Obsession Pine Branch.

Diana Nguyen, Poppystamps, Sweet 'n Sassy stamps, Christmas


Monday, November 30, 2015

CCNS113: White Christmas Shaker Card

Has it started snowing where you are yet?  We've yet to see flurries but this year I'm a little more eager than usual.  We got a new puppy - a Samoyed - and I know he will just love the snow.  So between my sleepless nights with a 2 month old pup and this week's inspiration photo, I made a shaker card with glass glitter for snow.  


Supplies:
Recollection glass glitter
Broken China and Chipped Sapphire distress inks

1.  Stamp tree in Versamark and clear emboss on white card stock.

2.  Mask moon and sponge night sky with distress inks. 
3.  Create shaker element with window die, clear card stock, and glass glitter.
4.  Cut kraft card stock with largest matting die.
5.  Add red poinsettia and trimmed bamboo shoots.
6.  Silver emboss sentiment and die cut with mini tag die.


Here's me with my furball.  So fluffy and cute!


Stay warm!


Challenges I am playing in:
Simon Says Anything Goes
WordArt Wednesday


Thursday, November 26, 2015

Christmas Shaker Card

Hello!  Diana here to share with you a shaker card for this most joyous holiday.  I first sponged a stitched rectangle made with MFT Blueprints 13 a couple of distress inks:  Evergreen Bough and Wild Honey.  I then die cut the Memory Box Cabrini ornament 3 times out of the sponged rectangle.  I then inlaid the outline of the ornaments back in and made the it the shaker front using clear cardstocksmall Joy! foam pads, sequins, beads, and rhinestones.  The backing of the shaker was another sheet of white card stock matted with red card stock cut with the largest rectangle die from Spellbinders A2 Matting Basics A.  
Diana Nguyen, Impression Obsession, Christmas, shaker card, Memory Box, ornament


I made my "tree branches" using Impression Obsession Pine Branch and topped it off with a sentiment from Sweet 'n Sassy Stamps Christmas Joy on a fish tail banner.

Diana Nguyen, Impression Obsession, Christmas, shaker card, Memory Box, ornament

Challenges I am playing in:
Simon Says Anything Goes
WordArt Wednesday


Beautiful Mess

Have any of you heard of MOPs?  It stands for Mothers of Preschoolers and is a great program for young moms in the midst of craziness.  It was great to get together with other moms who understood how amazing it was that they could make it to the meetings with little ones in tow.  One of the themes for one year was "Beautiful Mess."  Our lives may seem messy and out of control but God has a plan and He can make our messes beautiful.  I thought the stamp sets The Future and Grunge Elements 2 work perfectly together in light of this theme.

Diana Nguyen, Sweet 'n Sassy Stamps, Grunge elements, Future


Diana Nguyen, Sweet 'n Sassy Stamps, Grunge elements, Future

I hope you are encouraged and take these quotes to heart - especially if your life is a bit messy right now.


Don't forget today is the last day for the following special at Sweet 'n Sassy Stamps:
 25% off all dies! 
Please use the following code:
BDAYDIES25

Challenges I am playing in:
Simon Says Anything Goes
WordArt Wednesday

Monday, November 23, 2015

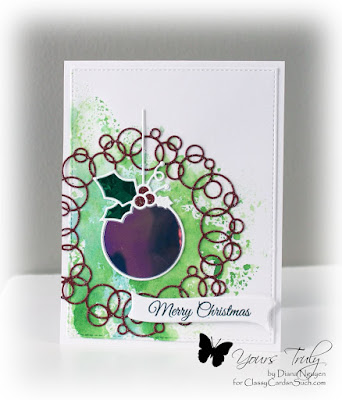
CCNS112 Shimmering Christmas

Hello!  I made a Christmas card for this week's Ornament Challenge.  

Supplies:

Sweet 'n Sassy Christmas Joy
Shimmer Sheetz Purple Iris and Peridot Gemstone


Diana Nguyen, Memory Box, Ornament, Christmas


1.  Die cut a stitched rectangle using MFT Blueprints 13.
2.  Smoosh the two green distress inks on bottom left of rectangle.
3.  Die cut Memory Box Loopy Loop Wreath out of glittered red card stock.
4. Die cut Memory Box Cabrini ornament out of white card stock, the Shimmer Sheetz, and glittered red card stock.
5.  Glue die cuts on card.
6.  Stamp and die cut sentiment out of white card stock and pop up on card.


Thursday, November 19, 2015

Not a moment

Taking a slight break from Christmas and fall cards to bring back a butterfly card.  :)

Supplies:   


1.  Die cut out of white card stock 2 stitched rectangles.
2.  Sponge in top corner with green distress inks and splatter with water.
3.  Die cut willow branch out of one of the stitched rectangles and extend the cut.
4.  Add a die cut of the butterfly.
5.  Stamp in bottom corner quote from God is and emboss in black detail embossing powder.
6.  Add a green double bow.


Challenge I am playing in:


Wednesday, November 18, 2015

Hope in God

I made this for this week's CAS leaves and color challenge this week at Splitcoaststampers.com.

Supplies:
My Favorite Things Blueprints 15

Diana Nguyen, Sweet 'n Sassy stamps, The Future, Nature Silhouettes, CAS

1.  Cut out stitched rectangle for base.
2.  Sponge clouds 
3.  Stamp leaves using red and green ink.  Go over with color pencils for a darker look.
3.  Stamp sentiment in bottom corner.


Challenge I am playing in:


Thursday, November 12, 2015

Christmas Joy

Today I am showcasing a card from the Christmas Joy stamp Set.  Cardinals are just perfect for Christmas, aren't they?  Such a beautiful red against green pine trees or white sparkling snow.  


Diana Nguyen, Sweet 'n Sassy Stamps, Christmas Joy


To make this card, I first stamped in Antique Linen distress inks and then colored in with watercolor brush pens.  I then went back and stamped several times to get the clearer outline in different colors.  I used a die-cut to cut it out and sponged the edges.  I added a banner and bow against some Christmas paper I found in my stash.

And remember, today is the last day for Free Shipping with your $30 order.  Please use the code BDAYFREESHIP.