I apologize in advance for a very long post - but the good news is you don't have to read much and can just look at the pictures! Lol!
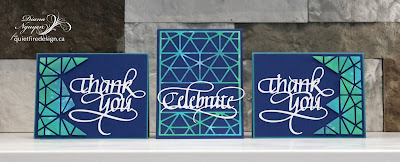
But briefly, I got this Geometric Die from Elizabeth Craft Designs and was able to make 3 (!!!) cards out of one run of the die. I am loving this method of making more with less. Here is all 3 cards - you can probably figure out how I did it but if you didn't, continue on!
I'll let the pictures do the talking and keep the explanations short:
Make a background. I used Distress Oxides. Die cut the sheet and leave everything intact on the cutting plate. (Yes, my cutting plate is in dire need of replacing!)
Carefully lift up the thin outline portion and washi tape onto base layer. Place the new Thank You die to the right. (A few of the triangles got stuck to the outline.)
Add foam tape to the rectangles that do not touch the word die.
Remove backing and carefully place all the rectangles back into the grid lines. The outline helps to keep the spacing between the triangles precise.
Lift up the grid lines and voila - you've got a clean background and now you can adhere the Thank You die on there.
You still have plenty of rectangles so now do the same thing with the "thank you" on the left.
And voila - you've got your second card.
For the third card, I noticed that the geometric background has a sort of symmetry to it and that there are 4 distinct blocks. I cut out the 3rd block, leaving the border intact and added the Celebrate die to the center. It was too busy for my taste to have all the lines in the background.
Just so you know, I still have all those triangles from the center of the die cut. Don't be too surprised if you see a 4th card soon with those pieces! These cards just make my mathematical background heart happy!


Thank you 2 die (Elizabeth Craft Designs | Quietfire Design)

Celebrate (Elizabeth Craft Designs | Quietfire Design)
Challenges I am Playing in:


No comments:
Post a Comment
Thank you so much for leaving a message!